Pages

Showing posts with label before and after. Show all posts

Thursday, July 12, 2012

Dresser into desk!

Back when I did my first bedroom mini-makeover (accent wall, new quilt, etc), I got a little dresser from DI for our clothes. It had a nice shape, but wasn't very functional. Too small, no runners on the drawers so it was hard to open, you get the picture.
Well, I've had this idea in my head for quite a while, and a few weeks ago, I pulled out my handy jigsaw (which I love--used it here and here and for a couple other things) and went to work.
The result?

My non-functional dresser (no idea why I took the picture from only the drawers up) is now the hub of my mom command station!

I took out the bottom two drawers, cut the supports off, and gave the whole thing a new paint job. Voila! New desk. I put it where the kids old art table was, next to our red couch in the family room. I was worried it would look too crowded, but it fits in just perfectly and doesn't feel crowded at all.
I've had the chair in my garage for over a year, just waiting for a makeover, and I really love how it turned out. This picture was taken before I really "moved in" to my new desk, so I added the captions so my lovely readers could get the whole idea. I'm excited to have a space of my own that I can use to keep our family organized--especially with Tempe starting school soon!
What are your best organization tips for all the paperwork that keeps a household running smoothly?

Monday, January 16, 2012

Bedroom hell(p)

So, whose master bedroom is the junk room?

*raises hand*

Nobody ever sees it, so it just makes sense for it to be the last room to be furnished/decorated and the first room to heap junk in, right?

Well, this year that is changing at our house!

We are finally going to do something about our master bedroom!


This is what our master bedroom looks like currently. One wall painted navy blue and the rest are still builder beige.

I've got some ideas, but I need your help. We are going to be painting the rest of the room the same color (navy blue) and I am dying trying to find an accent color that Jason and I both like. He has vetoed mustard yellow (my favorite combo) because it is too hipster (when is he going to accept that he is married to a hipster??) and I'm drawing a blank. I have two funky bedside tables that need a coat of spraypaint and probably some glaze, too, but I have to pick a color first!

So.... go!

Friday, June 10, 2011

pink and purple striped girl

Can you believe 6 weeks has gone by since Juno's open reduction and Spica cast???

I can't!

But the calendar doesn't lie, and today Juno's Spica was removed and a new cast was put on. Her hips looked good enough for her to go into a different kind of cast--a broomstick cast. It's really two casts, one on each leg from thigh to ankle, held apart by a bar (or two, in her case!) Since it's only on her legs, she can wear normal diapers and bend at the waist! Woohoo! It's the little things that make me happy :)


Here's one last picture of her in her Spica cast. Jason convinced me that we should keep it, so I asked the doctor to save it for me. It actually doesn't smell bad at all--she doesn't sweat yet and we didn't have any blowouts during the 6 weeks she was in it. Right now it's in two pieces, but I'm going to tape it back together.


I was going to mark on her ankle at the bottom of her cast so that we could see how much she grew, but I forgot to. But I can tell you that she grew a lot.


And her she is in her broomstick cast! She's wearing a onesie so you can't see that it's only on her legs. It is so strange holding her without her big bulky cast. She's almost seven months old but she has no trunk control at all. It's like trying to hold a 3-week-old upright! I hope she gets stronger quickly and will learn to sit up soon. I think she will be much happier if she can sit and play with toys instead of laying on her back all the time.

So we've got 6 more weeks in this cast and then hopefully, that will be it!

Wednesday, September 1, 2010

Play kitchen tips and tricks

Last summer my big Christmas project was creating a wooden play kitchen for my girls.
I started with this sad old tv stand from DI....

... and turned it into this!

Lately I've gotten a couple requests for information on how I made the kitchen and where I found parts, so I thought I would do a post on it. It's only September, but I think a lot of people already have Christmas on their minds (myself included)!
This really is an easy project. I have no experience with anything like this, and I managed it, so... yeah. Pretty easy.
There are a lot of these kitchens floating around blogworld--here are two of the kitchens I've seen all over the place. The second kitchen is the one that I modeled mine after.
  • I took both doors off the lower part of the tv stand. I used one of them as the oven door by putting it on hinges on the bottom. I used a magnet on the inside of the door and another one hanging down from the lower shelf inside the oven to keep the oven door closed. I used the other door to divide the bottom area in half by screwing it in place (through the bottom of the tv stand--turn it upside down).
  • The curtain is threaded onto a dowel, which hangs on those little gold hooks you screw into pilot holes.
  • DO NOT cut the hole for the sink like I did. I don't have a jigsaw, so I drilled holes with the largest drill bit I had as close together as possible in a circle, then hammered out the area inside the circle. It worked, but it's really rough and really jagged and not a nice tight fit. Buy a jigsaw, borrow a jigsaw, but you should definitely use a jigsaw to cut the hole.
  • I didn't do a great job on the faucet, either. Because of the way the storage shelf is positioned, it was really hard to screw it in place from the bottom and when I tried to do it through the top, it splintered the faucet. I would recommend using Gorilla Glue to glue it in place instead of trying to screw it in place.
  • I searched long and hard for the right accessories. The sink is a bowl from DI with a nice, wide lip. The faucet is a wooden letter J, painted silver and turned upside down. The knobs are corks painted silver. The burners are unfinished wooden spirals painted silver from either Michael's or Robert's--look in the bins of wooden flowers, ladybugs, trains, etc.
  • I primed the tv stand after taking it apart, then spraypainted each piece before putting it back together.

My kitchen is not perfect, but it's held up well over the last year and the girls love playing with it. So start looking at yard sales and thrift stores and get started on your own play kitchen project!

Sunday, November 29, 2009

D.I. Christmas finds

I posted about my love of D.I. and spraypaint a few days ago. Well, here are some of the things that inspired that post!

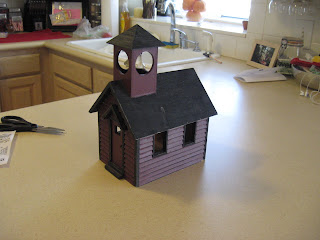
I found this chapel birdhouse. It reminded me more of a haunted house in its original color scheme.

But an entire can of white spraypaint later (yeah, it takes a lot of white to cover burgundy if you don't prime), it became a crisp, clean Christmas chapel. I left the roof black but very lightly sprayed some white on it to make it look like a dusting of snow.

Seriously ugly, right?

ooh la la! Now my reindeer is the perfect place to stash our Christmas movie and book collection.

Of course, Helena has another idea of what it is for...

Sunday, July 26, 2009

Christmas in July

Remember this post about my goal to do a homemade Christmas this year? Well, I combined that goal with my goal of getting all my Christmas gift preparation done in July this year.
Yeah. I know that's a little ambitious. So I changed it to getting the bulk of my Christmas presents for the girls done this month, and guess what, I did it! I might make some more things (for their stockings and dress-up box) but at this point, I feel like I am ready for Christmas. Well. For my kids. But not in any other way.

Here is Tempe's crazy rainbow wand.

A set of six doll diapers for Helena. I might buy her a new doll to go with them.

Can you guess which shirt belongs to which girl?

Another purchase--pots and pans from Ikea for Tempe. I still need to find a set of cooking utensils for Helena.

A family memory game for Tempe.

I'm not too happy with how this turned out--specifically that the fish look like whales. It seems wrong to let Lena fish for whales. But, Tempe played with it while I was cleaning up, and she loved it, so I guess it doesn't matter how it looks.

Crayon rolls for Tempe and Helena, and one for their cousin Libby's birthday this week.

And now for my crowning achievement in crafting. I can't claim credit for this myself, because I saw the idea on this blog and copied it shamelessly. But I am happy with how it turned out.
I took this...

... to this!


As usual, it is not perfect. But, remember, I am embracing my imperfection! I made a kitchen for Tempe and Helena! I made it myself! And it cost me less than $30.

Wednesday, May 13, 2009

that's better

I took my pantry from this

to this


in about half an hour and for less than $2.
Cute and useful.